Passo Duran - Moiazza Sud (Ferrata Gianni Costantini)
Starting point: Passo Duran (1605 m)
| Latitude/Longitude: | 46,32500°N 12,09583°E |
| |
Route name: Ferrata Gianni Costantini
Walking time: 11 h
Difficulty: extremely difficult marked way
Via ferrata: D
Elevation gain: 1273 m
Elevation difference along the route: 1273 m
Map: Tabacco št. 25
Recommended equipment (summer): helmet, self belay set, lamp
Recommended equipment (winter):
Views: 1.740
 | 4 people like this post |
Access to starting point:
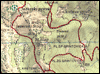
The starting point is on the mountain pass Duran, to which roads lead from Agordo and from the village Dont in Zoldo Valley (Val di Zoldo). For access from Slovenia, the second option is perhaps more appropriate. In this case, via Italian motorways A4, A28 and A27 we drive to the end of the latter past Belluno and from there we continue on the main road in the direction of Cortina d'Ampezzo. This road we already leave in Longarone and turn onto a side road into Zoldo Valley, through which we drive a good 20 km to the village Dont, where the road branches off to the left towards the mountain pass Duran. To the top there awaits us another 8 kilometres of ascent.
Route description:
At the beginning, an ascent awaits us towards the Carestiato Hut at the foot of the south buttress of Moiazza. To it leads marked path no. 549, which leaves the road on the south side of Passo Duran, right before it starts descending towards Agordo. First a moderate ascent across pastures awaits us, then the path joins a forest road and follows it eastwards more or less level to the hut. To here from the car we need less than an hour. At the hut we already find ourselves almost directly at the foot of the wall and our hearts tighten when we think that we have to climb over it.
Now the signpost for the Costantini ferrata leads us along some vegetated little ridge towards the wall, to which we need just over ten minutes. The entry is marked with a red rectangle visible from afar and a sign with the name of the route, and there is enough space so that before starting the climbing we can calmly don our gear and refresh ourselves.
When we finally start climbing, first an entry traverse awaits us. The first few metres run along a comfortable ledge, then the path immediately shows its teeth, rushing upwards and continuing with a traverse across the smooth wall to the left. The traverse is at times quite awkward (around C/D), so it quickly becomes clear what kind of ferrata we are dealing with. Finally the steepness eases a little and we find ourselves amid fairly level slabs that in this section form the rugged and not too steep lower part of the Moiazza buttress. Here the difficulty eases considerably, the path runs across inclined slabs with just a few steeper spots that are not overly demanding. In this section we gain height fairly quickly and soon approach the top of the aforementioned gentler part of the wall. Thus after about an hour of climbing the terrain levels out even more and in this section the cables end for a while. Red dots reliably guide us first in easier climbing across rugged rocks, then even along a little path through grass and scree all the way to the top of the lower part of the wall. Here we literally run into the upper, vertical section and it is immediately clear that we are facing one of the route's hardest spots. In short: about ten metres of vertical to slightly overhanging traverse diagonally left must be climbed. Although in addition to the cable rock-cut steps also help us, the passage is still demanding and tricky. And that's not all – at the end of the traverse a lifesaving bracket awaits us where we can catch our breath a little, but right after it we must climb along the cable and rare foothold pegs through a long and completely vertical chimney, followed by a few more vertical spots. From the top of the traverse about 50 metres of sheer vertical without real rest options await us, this section can certainly be rated D. Finally the cable gradually turns right, the steepness eases a little and we find ourselves at the top of the side pillar, which is connected to the main wall by a narrow notch over which we must straddle the cable a bit (attractive spot). Before us is a wide scree gully, at the top of which we spot a sign indicating that the spot is called Pala del Belia; we are at 2295 m above sea level. At this point we have climbed the key section of the lower part of the ferrata, and here the first option for an early exit from the wall also presents itself – right behind the notch over which we straddled the cable, we notice a faded mark on the rock for the turn-off to the Carestiato Hut, indicating the path along the ledge to the left. The exit is unprotected and not exactly easy, but it comes in handy if at the key spot we got scared that it's too much for us.
If everything goes according to plan, we will of course continue with the route. The initial ascent from Pala del Belia is surprisingly awkward, a shorter traverse and climb over a slightly overhanging bulge await us (around C/D, looks easier from below), but it is also very short. Above the bulge the difficulties calm down considerably and soon we find ourselves at the bottom of a long, wide and fairly level gully that the path follows for quite some time. We ascend more or less straight up, the terrain is somewhat loose, so caution is advised not to dislodge stones. Otherwise there are no difficulties, just the exit from the gully is vertical again and somewhat harder. At the top of the gully we are on a scree slope that we follow a bit higher, after which the path turns right, crosses a small notch and follows a ledge across a somewhat gentler wall to the right (friable, loose, unprotected – caution!). At this point a view opens down towards Passo Duran, so we can spot our car below and convince ourselves that we have already climbed quite high. But the end is still damn far away. We traverse for quite a while, finally above the ledge we spot cables again and the path turns upwards again. The section that follows is one of the easier ones in the ferrata. Climbing across not overly steep slabs, unprotected easier rocks and finally through a shorter somewhat steeper but nicely featured chimney follows, until we reach the side summit Cima Cattedrale at 2558 m. Behind us is already 700 m of wall, we are certainly quite tired by now, but we are approaching the ridge, the views are getting wider and we can feel it was worth the effort. Before us is the last part of the ascent to the ridge. It initially leads up a side ridgelet and is mostly unprotected, when the terrain steepens steel cables appear again. These lead openly and attractively up the side ramp for a while, then the path turns left, clings to the ledge and even descends a bit before the cables head across the wall towards the ridge again. The last part is somewhat harder again but cannot compare to what we climbed lower down. Finally the cables run out again and we make the last steps to the ridge along a comfortable path. Thus we reach the highest point of the Masenade ridge at 2737 m. No need to mention that a break is very welcome here – when the panoramic views open up and besides Agner and Pale, which we could already see during the ascent, we also spot Antelao, Pelmo and of course the Moiazza summit to the north, we will surely stand there with mouths agape and stop of our own accord. Just treat yourselves, we've come high! But it's superfluous to add – the summit is still far away, and back to the valley even farther.
From the top of Masenade the marks follow the ridge onwards. Here the path is mostly unprotected but in reality more or less easy – the ridge is sheer only on the left side, the right is gentle enough most of the time for normal walking along the top and we only deal with narrow exposed passages at a few individual spots. Steel cables do appear at a couple of spots but the passages are not problematic. Thus with expansive views we continue in a gentle descent until before Forcella delle Masenade a steeper step awaits, which is well protected so we descend it without issues and reach the notch. Here a second option for early exit from the ferrata presents itself – an inscription on the rock marks the turn-off right down scree towards Bivacco Grisetti in Val Vant della Moiazza, which is visible to the naked eye in good visibility. So if we've had enough climbing, it's about three quarters of an hour to the bivouac, from there path 578 can be followed back towards the starting point at Passo Duran. This exit is a bit awkward in the upper part, extensive scree fields can be problematic in poor visibility, otherwise it's entirely undemanding. Given that we are pretty tired at this point it will surely tempt us, on the other hand we may be too close to the summit to just abandon the route. So if we still have some energy it is certainly fitting to continue, but I must warn immediately that from here on the ferrata still has quite a bit of demanding terrain ahead and we are by no means near the end.
If we thus do not opt for the exit, the ferrata continues following the ridge on the other side of the notch, which is soon blocked by a vertical rock barrier. The path reaches a smooth rock slab a bit before it, bypasses it on the underside and approaches the wall. It does not enter immediately but descends a bit on scree to the right until a passage along a ledge opens in the wall. Here cables appear again, the passage is initially undemanding, then the path turns upwards and first leads through a fairly demanding steep chimney, at the end of which a short overhang must be climbed (athletic spot, two foothold pegs also help, around C/D), leading into easier rocks. Here the cables end again, and after a few steps the path reaches an extensive scree field below the upper headwall of Moiazza. Now about fifteen minutes of strenuous scree ascent await us, bringing us to a saddle below the summit wall where the path to the Moiazza summit branches right. The ferrata otherwise continues left, crosses the saddle and descends the other side to Bivacco Ghedini, but at this point it really isn't worth skipping the summit. To it leads just a half-hour spur of the protected path. In the same breath I must add that the first part of this summit spur is quite tricky and can easily compare in difficulty to the hardest spots in the lower section. But if we've got here and aren't really too exhausted, it's definitely worth going up to the summit.
The final ascent – if we decide for it – shows its teeth right at the start in the traverse immediately after the spur, just a couple of metres above the ground. This is perhaps the only spot on the entire ferrata where footholds completely run out for a few moves and we must rely solely on friction. Just a few moves, a metre or two long, but the passage is very awkward, especially since we must also switch the self-belay lanyards in the middle of it. Once over, still in the vertical wall we step onto a small ledge from which we must climb another vertical chimney where we can already use good holds (the passage certainly deserves a D rating). The chimney leads to the ridge which the cable now follows, taking us over another vertical spot, after which the iron ends for a while and we can say that we finally have our summit ticket in the bag. From here on there are no special difficulties. For a while we ascend in the ridge area then leave it to follow a narrow ledge left across a steep wall. The passage is very exposed but the first part of the ledge is quite easy, in the second part as the ledge narrows the cable reappears. Thus we follow the ledge around the side ramp after which the cables turn upwards again, taking us over nice climbing spots in a smooth but fairly level wall. At its top the cables end again and a comfortable path takes us in minutes to the fore-summit. To the main summit we must descend a bit and traverse the ridge (a few more short protected spots) to the final somewhat undercut gully through which we finally climb to the spacious plateau summit. Certainly one of the hardest-earned summits in our wider area, at least among those reached by marked path! So here we can let loose and enjoy the views which are now finally complete – only here does the view to the north open up too, where of course the queen of the Dolomites – Marmolada – takes centre stage. Once we've savoured them and refuelled we prepare for the still long and demanding descent.
For starters we must of course return to the summit path spur along the same route – the last part with vertical spots and smooth traverse at the end demands great caution. Once back at the junction we follow the numerous red dots northwest, cross the saddle and move into the buttress above Val dei Cantoi. Here one of the ferrata's most spectacular passages awaits – time to traverse the entire wall along the so-called Angelini Ledge. The narrow ledge winds above wild precipices but is wide enough most of the time for normal walking, where narrower the cable assists. In gentle descent we follow it for quite a while until it finally ends at a notch above Val delle Nevere on the mountain's north side. Here we turn right and traverse the ledge a bit longer (this one is somewhat more awkward and undercut than the previous but doable with care), then descend easy rocks to the scree below Moiazza's north buttress. In this way we have crossed practically the entire Moiazza group from south to north! Now scree awaits, down which we first descend briefly then cross to Bivacco Ghedini at Forcella delle Nevere. This spot is again suitable for a short break; a few things must be said here: firstly, the just-completed ledge descent is perhaps one of the ferrata's finest sections but also one where early-season snow can cause trouble. In that case winter gear is of course useful but the terrain is so steep that even fully equipped the passage is dangerous. Best to check conditions at the Carestiato Hut and set out only when it's certainly snow-free. Secondly, the bivouac is modest but allows emergency overnighting. If in trouble don't shy away from it, water might be the only issue as apart from possible snow patches there is none. And thirdly, in a pinch an easy descent north to Rifugio Vazzoler is possible. Of course this complicates the tour logistically terribly so this option is not recommended except in dire emergency.
Be that as it may, the "proper" descent route turns south here into the buttress above Val dei Cantoi. Here I can hardly say anything other than that the key question is how much energy we have left. For it's a sort of easier ferratina that first traverses a bit high above the valley then steeply descends the rugged wall. Technically there are no special difficulties but steep protected spots and especially unprotected sections on awkward friable terrain still demand full concentration for quite a while, especially since we are certainly pretty tired by now. We must descend some 500 height metres before the path turns among dwarf pines on the valley's east flank and finally becomes easier. Some traversing of dwarf pine terrain more or less level follows, then the path descends again through easier ground and some gullies to the valley bottom and along it at around 1800 m finally reaches marked path 554 which traverses from Vazzoler to Carestiato Hut. Only here can we finally relax and say we've got the ferrata in the bag. If we arrive here only at day's end – not unlikely – we'll be greeted by the silhouette of San Sebastiano and Tamer group summits in evening sun. And we can be proud of our achievement.
Difficulties are irrevocably over here, and to the starting point just half an hour's traverse below the walls to Carestiato Hut remains (which we're surely a bit fed up with by now), from where we return to Passo Duran along the familiar path.
The Costantini ferrata is certainly one of the Dolomites' grandest. It is the longest of all and in existing guidebooks is often described as the most demanding too. In reality it's not technically extreme (reaches D difficulty at a few spots, never exceeds it) and several other Dolomite ferratas surpass it (Piazzetta, Magnifici 4, Sci Club 18 and others). Also mitigating is that the route is excellently protected, virtually every peg is perfectly placed. On the other hand the combination of length, high-mountain environment, unprotected sections and decent technical difficulty nonetheless makes for a very demanding tour. It's wise to attempt it only after some experience with similarly difficult ferratas and no fitness issues, and even then consider overnighting at Carestiato Hut and entering the wall early morning. To all who meet these criteria I warmly recommend the route; the combination of a great Dolomite wall, excellently routed path over fine climbing spots and lavish views will leave no one unmoved.
Along the route: Rifugio Bruto Carestiato (1834m), Pala del Belia (2295m), Cima Cattedrale (2558m), Cresta delle Masenade (2737m), Bivacco Ghedini-Moiazza (2601m)
Photos:
 1
1 2
2 3
3 4
4 5
5 6
6 7
7 8
8 9
9 10
10 11
11 12
12 13
13 14
14 15
15 16
16 17
17 18
18 19
19 20
20 21
21
Discussion about the trip Passo Duran - Moiazza Sud (Ferrata Gianni Costantini)
To post a comment you must log in:
If you do not yet have a username, you must first
register.